Yet another project !
I was tired of listening to the local radio on my car, I wanted my own music. So in that case you have 2 possibilities: either you buy an other system or you build yourself a super carputer ! Needless to say that I chose the second option.
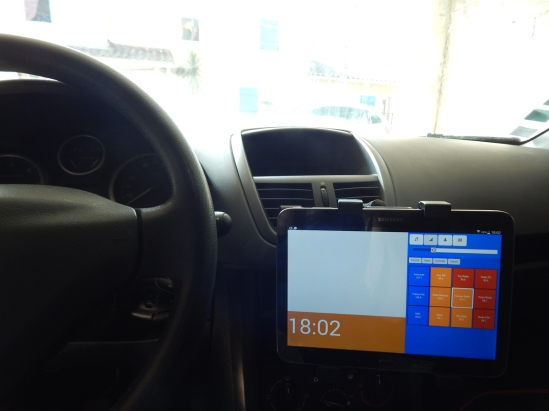
My carputer
In this article I am going to describe the different choices I made to build it, but this is not going to be step by step tutorial to build yours.
Basic features
I wanted this computer to play my music (from my usb key) but also radio. In order to do this I used the latest Raspberry Pi 3.
I needed a soundcard to connect to my car’s speakers, I decided to use the X400 Expansion Board. Why ? Because it is compatible with the latest Raspberry and can support a lot of different input voltage.
I bought it on banggood (few weeks for shipping but very low price) : link to the product.
The screen
Instead of buying a big expensive touchscreen for the raspberry pi I decided to take an other approach. I used a big expensive touchscreen that I already had : my tablet. Using WiFi to communicate with the raspberry this gives a lot of advantages : this frees the raspberry pi in terms of ressources (no need for any graphical interface on the Pi), the “screen” can be taken away (less risk of theft).
The radio
In order to listen to the radio, I used a RTL SDR. The hardest part was to a way to connect it to my car antenna. The socket on my car was “Fakra” and I found no connector Fakra to MCX (the connector on the SDR). I finally found a way by using 2 adapters : Fakra -> SMA -> MCX.
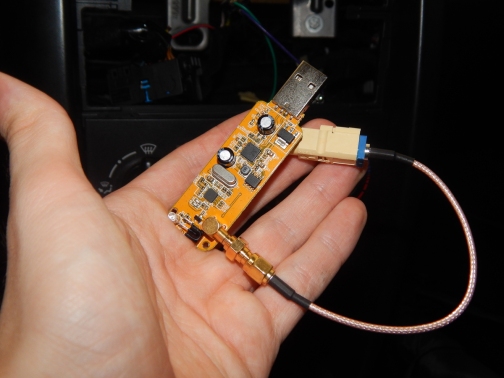
My SDR module plugged to the antenna of my car
Not only is the SDR module cheap, but it can also receive a lot of type of frequency. For now I can only listen to FM radio (software used SoftFM). But in the future and I also want to listen to airband of course !
Links :
- RTL SDR based on a cheap tv tuner
- Adapter MCX <-> SMA
- Adapter Fakra <-> SMA (the only one I found was on a french website)
Powering
Powering the Pi with the car is that as easy as you think. Indeed the voltage from the battery is not a constant 12V. Fortunately the X400 takes care of that without any problem because it can handle voltage from 6 to 24V.
On a lot of cars you have two wires : one for permanent +12 and an other one active only when the engine is turning. This wasn’t the case on my Peugeot 207. I simply made a switch that I use to switch on the Pi and switch it off (only when i’ve halted it from the tablet).
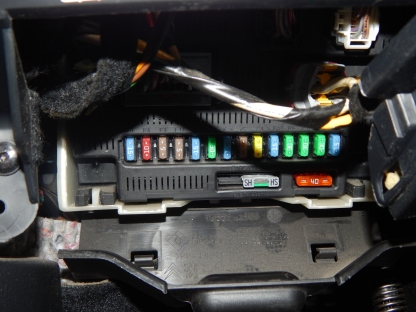
The fuse box on my car
Be caution when you connect your wires, if you don’t want to become Claude François I recommend you to remove the appropriate fuse from your fuse box.
Software
The Raspberry Pi is configured as if it was a web server (apache2, php5 …). It is set as a wifi hotspot (this link might help you to configure it properly).
So my tablet is simply connecting to a local website. Request are sent using ajax (Jquery makes the task easy).
I use moc as my music player.
This is what the interface looks like on the tablet
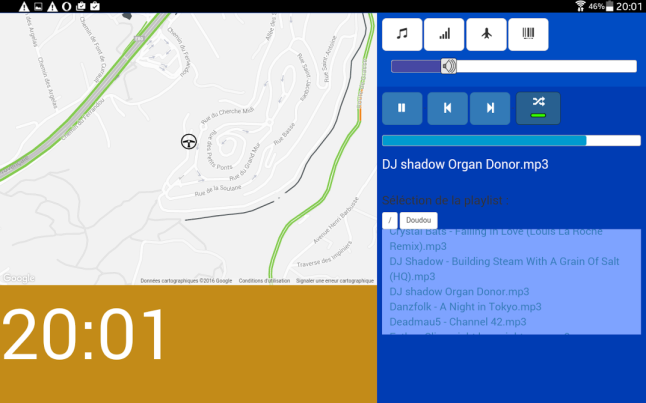
Screenshot on the interface
The map displays traffic in real time, and of course as I love and respect the law it does not show the location of automatic radars.
The map only works when connected to Internet, that’s why I plan to add a 3g stick to the Pi.
I also plan to try to access to the CAN network in order to have wheel command (but that seems to be a hard job to do). Update : done here
To be continued …

Did you think about using an ODBC adapter ? It usually works in Bluetooth and allows to get access at all electronic data of engine and car ! Exists even on cheapest ones like my Dacia 😉
LikeLike
I think you meant OBD 🙂
LikeLike
Yes I considered OBD, I even bought an USB ELM327 that isn’t working so I need to buy an other one if I want to experiment with it.
However I think that I will maybe use directly a CAN bus reader in order to get wheel commands (because I don’t think that I can get them from the OBD protocol …)
LikeLike
Very nice project! Would you like to share the code you wrote, so we could build one? Perhaps in github?
LikeLike
The html/php code itself is relatively simple but the configuration behind it is more complex (apache configuration, software installed etc …).
So if I want to publish the source code it need to upload the whole content for the SD card I guess …
LikeLike
The html/php code would be nice. It would help me get started on my own.
LikeLike
Hello, I can if you want give you the php code, but I would rather advise you to create your own. Mine is very ugly and has a lot of quick fixes so I think that you will spend less time creating your own that fixing mine.
However if you want it as an “inspiration” I can still send it you by mail 😉
LikeLike
Which RTL-SDR device did you go with?
LikeLike
It’s an RTL2832U widely available on Internet 😉
LikeLike
Couldn’t you just use your cellphone to add internet access? It wouldn’t cost anything.
LikeLike
Where are the instructions to build this? It looks so kool!
LikeLike
Hi Nice Projects, i really interested on how you use table for screen.
at most project i seen, it works like what you told above, raspberry pi will be as web server, and table will access it using web browser.
but at your video, i don;t think you use browser (isn’t it?), so i curious how do you did it?
LikeLike
Hello, It was done with a browser (Opéra in the video, even if it seems weird it is the browser that works best with my application ^^, Chrome refuses ).
It seems that it is not because it is in fullscreen. On most of the tablets if the page is bigger than the screen, the page will go fullscreen while scrolling down. That’s how I did it, I designed a page slightly bigger so I can slide down to switch it to fullscreen (I know that there are ways to have fullscreen with html5 but my tests didn’t end up well : https://www.sitepoint.com/use-html5-full-screen-api/ )
LikeLike
Ho i see, ok i got it. thankyou
LikeLike
Nice post,
I create similar system at this time.
I use STM32 for chating with car and other devices:
OBD II (CANbus, J1850 bus)
Car’s Analog inputs (doors, hand brake and ect)
Bluetooth, GPS, Radio (FM+DAB)
Microcontoller gathers together all signal and sends it to Windows PC’s COM-port.
Now, I want to use Raspberry, but it has very long time for wake up. How much it in your system?
LikeLike
Thank you !
It usually takes between one and two minutes before it is ready to be used. But that’s not a problem for me as it is the first thing I turn on when I get in my car.
LikeLike
Nice project, I have planned to create a similar on board computer to run a smb server to ipads and also smb music library to my iphone/car stereo. The one issue I have imagined is getting clean power to the pi and an external drive when starting the car. When I turn the ignition the radio cuts off for a few seconds. How did you work around this issue with your car?
LikeLike
Hello,
The ignition of the car is usually taking of lot of current so there is a voltage drop.
In my case I think that the suptronic card does a good job by regulating (but I also think to my car gives a good power too 😉 ).
LikeLike
Hi Ben,
Fantastic project!
I’d be really interested in featuring your ‘Carputer’ in an upcoming issue of Linux User & Developer Magazine. Do you perhaps have an email or Twitter account that I could send you a message on?
Hopefully it’s something you’d be interested in doing!
Many thanks,
Oliver Hill
Features Editor @ Linux User & Dev Magazine
Twitter: @BlahBlahOli
LikeLike
Hi Ben, great article, I’m following this to hook my rpi3 to my camper van and have bought the x400 which arrived today from china. I have it powered in the house at the moment on a universal power adaptor, do you have more details on how you hooked this up to the car and what you needed (if anything) for this? I am in France so feel free to respond in french or recommend any french stores. Thanks!
LikeLike
Hello, I am going to answer in English (if it can help others).
I bought this jack to plug to the Rpi https://www.banggood.com/Wholesale-2_1-x-5_5mm-DC-Power-Male-Plug-Jack-Adapter-Connector-For-CCTV-Camera-p-39991.html?p=W016111637439201505V (of course any other similar product on any website is fine).
I then soldered it to the a switch and then connected it the wires that were going to my radio. I used shrinking tubes to make sure everything was isolated. Here is what it looks like
https://www.hostingpics.net/viewer.php?id=588072DSCN7723.jpg.
For the speaker I hooked the wires directly to the board.
I hope it helped you 😉
Ben
LikeLiked by 1 person
That’s great thanks Ben! Loving the X400, hooked it up to speakers today and the sound quality is incredible. Had a look at volumio which is awesome but struggling a bit with installing other software (which works fine on vanilla Jessie have bought a GPS and an RTL-SDR and want to get them all hooked up. Will put a Github repo once I get up and running. Thanks again for the blog and inspiration!
LikeLiked by 1 person
Hi, love this project. I’m thinking about doing something very similar. I wonder if u could send me your code, so I can get some inspiration?
LikeLiked by 1 person
Reblogged this on Bilgehan KAMBER 's WordPress 💻 🖱 and commented:
Nice project 🙂 I ll try it
LikeLike